Act as a senior journalist and professional content writer to write 1500+ words news article, SEO-optimized news article,, easy-to-understand news article. Begin with a compelling, keyword-rich title wrapped in an H1 HTML tag (
). Follow with a bolded one-paragraph summary wrapped in a div with the class name “yellowbg” (
[Insert Summary]
). Structure the article with an engaging lead paragraph that answers the 5 Ws and 1 H (Who, What, Where, When, Why, and How), followed by informative subheadings (use
for main subheadings and
for supporting subheadings). Include bullet points for key highlights, relevant quotes, and data where applicable. Use simple, clear language for broad accessibility. Conclude with a strong closing paragraph, a list of keyword-rich terms, and relevant hashtags. Ensure the content is well-structured, concise, and tailored for readability while maintaining a professional tone. Example format:
[Insert Title]
, Summary:
[Insert Summary]
, Lead: [Engaging opening answering 5 Ws and 1 H],
[Main Subheading]
, [Key points],
[Supporting Subheading]
, [Key points], Conclusion: [Closing paragraph], Keywords: [List], Hashtags: [List]. Rewrite the following content accordingly:
Summary
Android Canary provides continuous updates with new builds for a sneak peek at upcoming features before Beta releases.
Easy to get started by using Android Flash Tool to flash Canary build, receive OTA updates automatically.
Android Canary allows you to customize installation process and stay on the bleeding edge of Android updates cautiously.
For a long time, Google has released “Developer Previews” ahead of new Android versions. However, those would get replaced by the Beta releases as the final version got closer. Now, you can stay on the bleeding edge with Android Canary builds.
Unlike the more stable Beta program—which concluded for Android 16 in April—Android Canary offers you continuous, rolling updates with the newest platform builds. You get a sneak peek at what’s cooking in Google’s labs before it’s even ready for the beta track. This means you’ll encounter bugs, unfinished features, and possibly even breaking changes. It’s not for the faint of heart, or for your primary device. But if you’re a developer, or just someone who loves to tinker, it’s an exciting new opportunity.
If you want to live on the bleeding edge of Android updates, or you’re a developer who needs to test apps on upcoming Android releases, there’s some good news. Google is overhauling the complicated Android Developer Previews into a new Canary channel.
Getting started with Android Canary on your Google Pixel device is straightforward, though it involves a step that might be unfamiliar to some. You’ll need to use the Android Flash Tool (which requires Chrome or Edge). This web-based tool allows you to flash a specific Android build directly onto your supported Pixel phone. Once you’ve successfully flashed a Canary build, your device will automatically be enrolled in the Android Canary for Pixel channel. From then on, you’ll receive continuous over-the-air (OTA) updates to the latest Canary builds, without having to manually flash each new version.
So, the first thing we’ll do is go to the Android Flash Tool website. Connect your phone to your computer with a USB cable and click “Get Started.” You’ll also be asked to “Allow ADB Access” during setup.
If your device isn’t detected, make sure you have Developer Mode enabled and USB Debugging and OEM Unlocking toggled on. Click “Add New Device” and choose yours from the pop-up window. When you try to connect, you’ll see a pop-up on your phone asking you to “Allow USB Debugging.” Tap “Allow” to proceed.
Every Android device—from Amazon Fire TV to Samsung Galaxy—has a hidden “Developer Options” menu chock full of goodies. You don’t have to be a developer to take advantage of these secret features, though. We’ll show you how to find them.
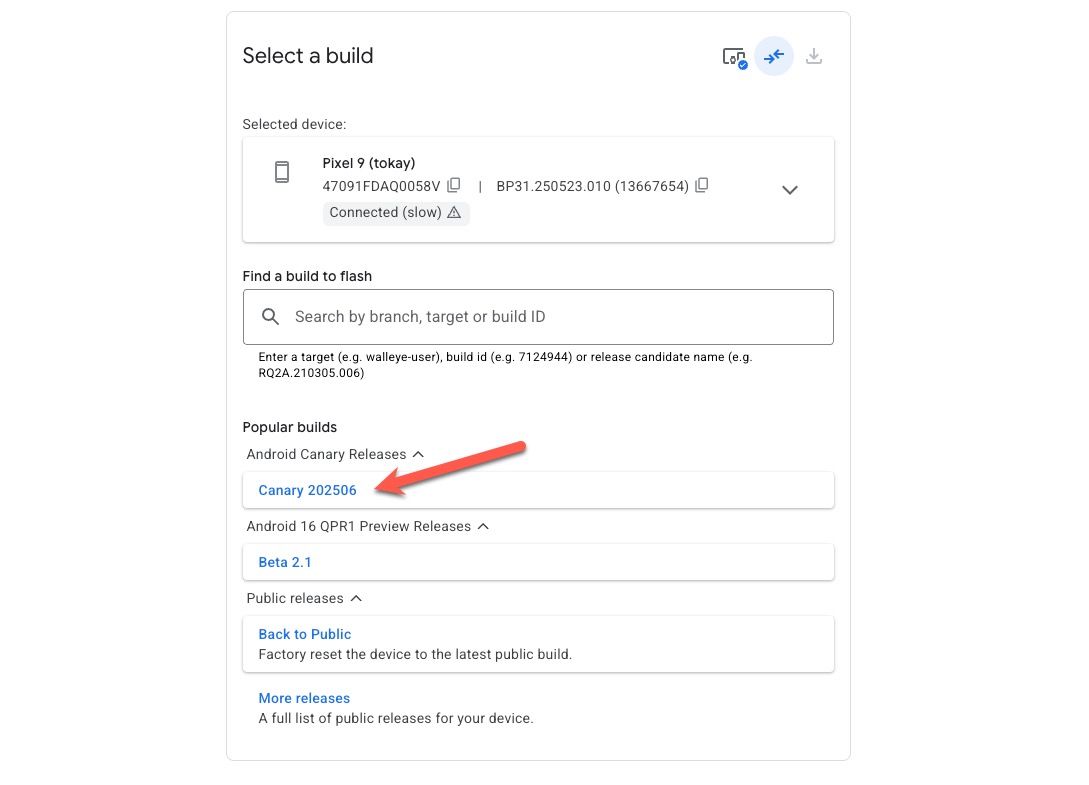
You should notice the Android Flash Tool website load up some options for you. To install the Android Canary build, select “Canary” from the build section.
Now you can tap the pencil icon to adjust how the build will install. For example, maybe you don’t want to wipe the device or lock the bootloader. Once you’ve made your selections, click “Install Build.” You’ll have one more chance to confirm before it installs.
During the installation process, you need to keep the phone plugged into the computer. It will reboot a couple of times, depending on what you selected. The web page will tell you when everything is complete and you can unplug your phone.
That’s all there is to it. As mentioned, you’ll only need to use the Android Flash Tool for this initial installation. After this, subsequent Canary builds will arrive on your device via an OTA update, just like a normal update. If you’re ready to dive headfirst into the future of Android, the Canary channel is the way to do it. Just remember to proceed with caution, back up your data, and be prepared for an adventure.
In Android, Developer Options is a secret, hidden menu with a variety of advanced options. These features are mainly intended for developers, but many of them can be useful to average Android users and enthusiasts. We’ll share some of the best. Before we start toggling things on, you’ll first need to perform a secret handshake to enable the Developer Options menu in Settings. Since these options aren’t intended for the average user, the menu is hidden by default. Follow our simple steps to quickly enable Developer Options.